Step 1: Access Service Engineer Management #
- Open the FieldAx Admin app.
- Navigate to the Service Engineers tab.
- Click New.
Step 2: Link to User Account #
First, associate the engineer with a Salesforce user.
User Association
- User: Click the lookup and select the Salesforce user.
- This links login credentials to field operations.
- It ensures proper data access and security.
Step 3: Basic Information #
Enter the essential engineer details.
Personal Information
| Field | Example / Note |
|---|---|
| Engineer Name | Auto-populated from User |
| Employee ID | EMP-2024-0156 |
| Mobile Phone | (555) 123-4567 (required for dispatch) |
| Secondary Phone | (555) 123-4568 |
| Auto-populated from User |
Employment Details
| Field | Example |
|---|---|
| Hire Date | 03/15/2020 |
| Engineer Type | Full-Time Employee |
| Status | Active |
| Seniority Level | Senior Technician |
Step 4: Add Regions #
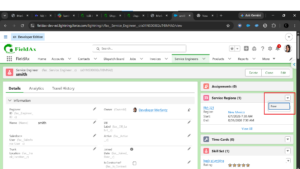
Go to the Service Regions related list, then:
- Add a new Service Region.
- Pick the region the engineer should be assigned to.
- Enter the start and end dates.
Step 5: Configure Work Calendar #
Set the engineer’s working hours so availability displays correctly on the Dispatch Board and Quick Schedule.
Work Calendar Configuration
| Field | Example / Note |
|---|---|
| Working Days | Monday to Friday (select applicable days, Sunday to Saturday supported) |
| Start Time | 8:00 AM |
| End Time | 5:00 PM |
| Same Hours for All Days | Yes/No (set per-day hours if unchecked) |
Once configured, the engineer’s calendar shows white blocks for available time and grey blocks for non-working hours across the Dispatch Board and Quick Schedule.
Step 6: GPS Tracking Settings #
Configure location tracking for dispatch.
Tracking Configuration
| Field | Example |
|---|---|
| Enable GPS Tracking | Yes |
| Tracking Start Time | 7:45 AM |
| Tracking End Time | 5:15 PM |
| Tracking Interval | 5 minutes |
| Tracking Days | Monday to Friday |
Map Location Update
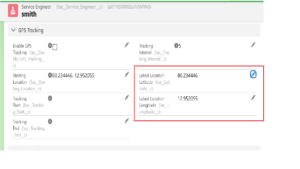
The Service Engineer record stores the engineer’s most recent position in two fields: Latest Latitude and Latest Longitude. The engineer’s location on the map view is based on these fields.
When GPS is integrated, these fields are updated with the engineer’s latest coordinates. Each time they change, the engineer’s location on the map changes as well.
- GPS tracking sends the engineer’s current location.
- Latest Latitude and Latest Longitude are updated with the new coordinates.
- The engineer’s marker on the map view moves to the updated location.
Step 7: Vehicle and Equipment #
Document the resources assigned to the engineer.
Vehicle Information
| Field | Example |
|---|---|
| Vehicle Type | Service Van |
| Make/Model | Ford Transit 250 |
| Year | 2022 |
| License Plate | IL-FSV-1234 |
| VIN | 1FTBW2CG6NKA12345 |
Equipment Assigned
| Item | Example |
|---|---|
| Laptop/Tablet | iPad Pro 2023 |
| Tools | Standard HVAC tool set |
| Safety Equipment | Complete PPE kit |
| Testing Equipment | Digital manifold, multimeter |
Step 8: Trunk Stock Location #
Set up mobile inventory. This creates an inventory location that travels with the engineer.
Trunk Stock Configuration
| Field | Example |
|---|---|
| Trunk Location Name | Van-1234-Stock |
| Location Type | Mobile |
| Assigned Engineer | Current engineer |
| Stock Level | Standard |
| Replenishment | Weekly |


