A checklist tells your service engineer what to check, photograph or record on a job. You set it up once for each Job Type, and it appears on every job of that type.
1. Open the Job Type #
- Go to the Job Types tab.
- Click the Job Type you want to add a checklist to (for example, Installation).
2. Add a Checklist Item #
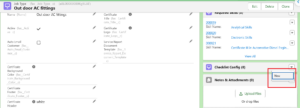
- On the Job Type page, find Checklist Config on the right-hand side.
- Click the small arrow next to it and choose New.
- Fill in the form (see Section 3).
- Click Save. To add another item straight away, click Save & New.
Tip: Repeat these steps for every item you want in the checklist.
3. Field Guide #
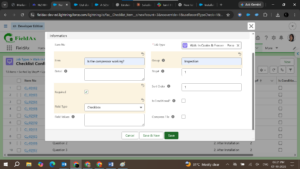
| Field | What to Enter |
|---|---|
| Item | The question or task for the engineer. Example: Upload photo before installation |
| Detail | A short note to explain the item. Example: Photo before work |
| Job Type | Filled in for you. It is the Job Type you opened. |
| Step# | The step number. Leave it as 1 unless you need steps. |
| Field Type | How the engineer will answer (see Section 4). |
| Group | A heading that keeps related items together. Groups appear in alphabetical order (see Section 7). Example: A – Before installation steps |
| Field Values | The choices to show for options like Picklist or Radio Button. |
| Sort Order | The order of the item within its group or page (1, 2, 3…). |
| Compress File | Tick to make uploaded photos and files smaller. |
| Required | Tick if the engineer must complete the item. |
4. Field Type Options #
| Field Type | The Engineer Can… |
|---|---|
| File Upload | Upload a photo or file |
| Checkbox | Tick for yes or done |
| Radio Button | Choose one option from a few |
| Picklist | Choose from a dropdown list |
| Text Area | Type a longer note |
| Decimal | Enter a decimal number |
| Date | Pick a date |
| Time | Pick a time |
5. Making an Item Compulsory #
Tick the Required box on the item.
- Ticked: the engineer cannot skip the item and must complete it.
- Not ticked: the item is optional.
6. Grouping Items #
Give related items the same Group name so they appear together. For example, all pre-installation checks can use the group A – Before installation steps.
Important: Type the group name exactly the same on every item.
7. Order of the Groups #
Groups are shown in alphabetical order of the Group name. A group whose name starts with A appears on the first pages, then B, then C, and so on.
| Group Name | Where It Appears |
|---|---|
| A – Before installation steps | First pages |
| B – During installation steps | Next pages |
| C – After installation steps | Last pages |
Tip: To control the order, start each Group name with a letter (A, B, C) or a number (1, 2, 3). Without this, groups follow the alphabet of their names. For example, After installation would come before Before installation, even if the work happens in the opposite order.
Important: If you use numbers, use the same number of digits on every group (01, 02 … 10). Otherwise 10 will sort before 2.
8. Example: Compulsory Photo Before Installation #
- Open the Installation Job Type.
- Next to Checklist Config, click the arrow and choose New.
- Enter the following:
| Field | Value |
|---|---|
| Item | Upload photo before installation |
| Detail | Photo before work |
| Field Type | File Upload |
| Group | A – Before installation steps |
| Compress File | Ticked |
| Required | Ticked |
- Click Save.
Result: The engineer is asked to upload a photo at the start of every Installation job and cannot skip it.
9. Checking Your Checklist #
Go back to the Job Type page. The Checklist Config list shows all your items.
- Click View All to see the full list.
- Click an item number (for example, CL-00102) to edit that item.


